

A/C - R-12 to R-134a Conversion Procedure
Click here for a printer friendly page
I have both the "Proper Book Way" for the purists in the crowd or "My Way" specifically for Grand Wagoneers which saves a bunch of steps and is quite effective.
The Proper "Book Way"The following procedure should only be performed on vehicles to maintain a/c operation when R-12 refrigerant is no longer available, (realistically about now). Cooling performance may be less than the original system depending on operating conditions and may vary between models.
MODELS:
1988 - 1991  (SJ)   Grand Wagoneer
1988 - 1994  (XJ)   Cherokee/Wagoneer
1988 - 1994  (YJ)   Wrangler
NOTE : WHEN SERVICING THE AIR CONDITIONING SYSTEM, FOLLOW ALL CAUTIONS AND WARNINGS AS OUTLINED IN THE APPROPRIATE SERVICE MANUAL.
PROCEDURE:
| A. | INITIAL SYSTEM OPERATION AND PREPARATION
|
||||||||||||||
| 2. | With the compressor off the vehicle, refill with new R-134a refrigerant oil in the amount called out in the Adaptation Component Chart. |
| 3. | Remove and discard the filter/drier/accumulator. |
| 4. | Replace the HPRV (High Pressure Relief Valve) with the specified R-134a part listed in the Adaptation Component Chart. Refer to the appropriate Service Manual for location. In some applications the HPRV is located on the filter/drier. The HPRV on the new filter/drier must be replaced with the new R-134a HPRV. |
| 5. | Replace the HPCO (High Pressure Cutout switch). Refer to the appropriate Service Manual for location. For vehicles without HPCO switches, install a switch and wiring overlay in the system on the high pressure R-134a adaptor switch tee as specified in the Adaptation Component Chart. For SJ/XJ/YJ vehicles, the LPCO (Low Pressure Cutout Switch) is located on the filter/drier and must be replaced with a dual function HPCO/LPCO switch as specified in the Adaptation Component Chart. |
| 6. | Install the filter/drier or accumulator using new R-134a compatible gaskets or 0-rings. |
| 7. | Install the compressor on the vehicle using the new R-134a compatible gaskets or 0-rings. |
| 8. | Clean old R-12 service ports with a steel brush. |
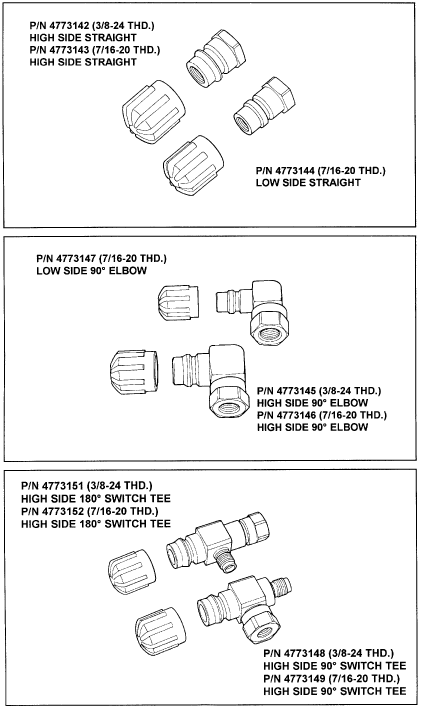
| 9. | Review the R-134a adaptor choices as identified in the Adaptation Component Chart. Refer to the R-134a Charge Port Adaptor chart and select the appropriate port adaptor which allows for sufficient clearance in the engine compartment to attach R-134a service equipment couplings and/or HPCO switches. Also check for proper clearance between the hood and the R-134a adaptor/switch. |
| 10. | Evacuate the system for a minimum of 45 minutes at 26 in. Hg or greater. Charge the system with R-134a with the amount called out in the Adaptation Component Chart. |
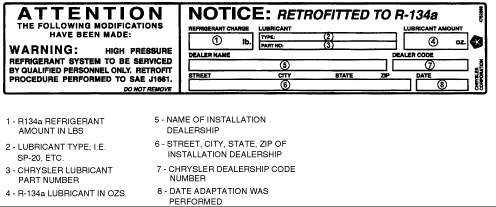
| 11. | Fill in the required blue R-134a A/C adaptation label, P/N 4762869, using a typewriter or ball-point pen. See label illustration for details. If possible, place the new label over the existing R-12 label. If the new label does not completely cover the existing label, remove the old label before installing the revised label. If the A/C information is part of a general vehicle information label, cut out only that part that pertains to the A/C system. |
| 12. | Check system for leaks with approved R-134a equipment that meets Chrysler and SAE J1627 specifications. |
| C. | PERFORMANCE TEST PROCEDURE
Review Safety Precautions and Warnings before proceeding with this procedure. Air temperature of the test area and inside the vehicle must be 70°F (21°C) minimum for this test.
|
It's not necessarily the best way but its down & dirty & it works.
(These directions are specific to Grand Wagoneers with the York Compressor)
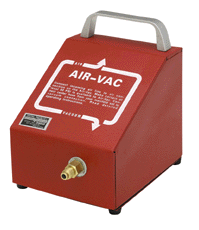
It's also nice to have a manifold gauge set and a vacuum pump so you can at least vacuum down the system to remove both any air & moisture in the system. The vacuum pump I use is from Harbor Freight tools ( http://harborfreight.com ) & costs a whopping $9.99 plus shipping. It connects to your air compressor and connects thru the manifold gauge set to the compressor. It uses a ton of CFM's & may not work on a small 1 or 2 hp compressor.
 |
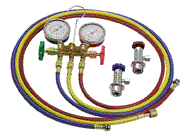 |
| Vacuum Pump Harbor Freight Item # 3952 | Manifold Gauges |
You will need an a/c wrench to open the service valves used on the Grand Wags. I don't have one so I just use a 1/4" socket from one of those dinky cheap socket sets with an adapter for my 3/8" ratchet and it works fine. I have a pic of the operation of the service valves but basically you will turn them in, or clockwise, about mid-way open, to open to the service position, which will then open the hose fitting to vacuum & fill the system. You turn them to the left, or counterclockwise, to shut off the service port when you are done.
Note: Opening them fully clockwise isolates the compressor from the lines which would be used when replacing the compressor & not dumping the charge. DO NOT use this position when trying to vacuum or charge the system.
You start by removing all the existing refrigerant from the system. I'm assuming you either have a recycling machine or have a shop do this for you. Right...
I then remove as much of the oil as possible from the system with a suction attachment I put in the oil fill hole under the bolt about center of the top of the a/c compressor. Check the o-ring gasket under the bolt before you re-install it. A "trick" on removing the oil comes from Roland on the FSJ-List, (full size jeep list - fsj-list@yahoogroups.com), is to open both service valves & use some air pressure, (moderate to low pressure), to the high pressure fitting & blow the oil out thru the low pressure side. It seems a better way to remove as much of the old oil as possible. I haven't tried this trick yet but I will shortly when I find the leak on my 84 thats driving me batty!
You will need to install the new conversion fittings on top of the old R-12 fittings carefully so you don't strip them since most of the conversion kits use cheap alum fittings. I usually do this after I vacuum out the system as my gauges use the R-12 fittings rather than the 134a fittings.
Attach a/c manifold gauges to the vehicle. Make sure you attach the correct hose to the proper service port. This is very important to prevent personal injury! The blue hose, or Low Side, connects to the fitting closest to the top of the compressor and the red, or High Side, connects to the bottom or lowest hose connecting to the compressor. Attach center (Yellow Hose) to a vacuum pump. This will allow the system to be evacuated through both the low and high side of the system. If you don't have a high side adapter or way to connect to it don't worry as I've done many by only vacuuming thru the low side.
With hoses connected to the manifold gauges and connected to a vacuum pump, open the service valve(s) to the high side & low side by turning them clockwise, start the vacuum pump then open the valves on the manifold gauge set. Let the pump run about 20-30 mins or so and you should see a good vacuum registering on the gauges. Close the valves on the gauge set then shut off the vacuum pump. Let the system sit for at least 10-15 minutes to check for leaks in the system. If the vacuum leaks down at this point and its not because of bad hose connection you will need to find & correct the leak before you go any farther or you're wasting money on refrigerant.
Now, assuming the vacuum is still holding, a trick I learned recently from one of the forums on http://ackits.com was to go ahead & restart the vacuum pump, open the valves on the gauge set & vacuum the system again for at least another 10 minutes. At this point wait 5 to 10 minutes letting the vacuum boil off any moisture trapped in the refrigerant oil. I noticed when I do this, the vacuum will also drop a couple more pounds (inches). After the second vacuum, shut off the manifold gauge vales, the vacuum pump & close the service ports by turning counterclockwise.
Now is the time to install the R143a fittings if you already haven't done so. Some of the fittings, (but NOT all), have the schraeder valve installed which must be removed before installing the conversion fitting so take a look before you install the fitting, (they look like the valve in your tire stem). You can remove them with a tire stem tool or a pair of tweezers & a pair of pliers. Take your time so you don't strip or twist off your existing fitting when installing the R143a fitting(s). On the Grand Wags with the service valves it normally doesn't make a difference if the schreader valve is in place as long as you can vacuum down & recharge the system as the service valves shut off the fitting anyway.
At this point, you are ready to add oil & fill your system. Your compressor will also NOT start because of the low pressure cut-out switch located on the passenger side wheel well. The wires feed thru the harness & connect in the area of the compresor. The black wire from the compressor connects into a bullet connector that feeds to the switch and the power to the compressor connects to the line back from the switch. (They're brown on all from my 82 thru my 87). I usually disconnect the wires to the switch & connect the black wire directly to the feed. Start the engine & turn the a/c switch to cold & max fan setting.
I usually use a can tap as until recently I didn't have the proper 134a hoses & adapters for my gauge set. With both dials closed remove the center charging hose attached to the vacuum pump and connect it to either a can tap and refrigerant or 30lbs refrigerant cylinder. Open the valve on either the can tap or 30lbs cylinder allowing refrigerant into the charging hose. With refrigerant in the charging hose slowly crack this hose at the manifold gauge bleeding off any air that may have gotten trapped when moving from the vacuum pump to the refrigerant source.
Don't forget to re-open the service valves, (turn clockwise or right to open), using the 1/4" socket or you will not be able to charge the system. I also put an electric fan in front of the car to blow air on the condensor coil. This will help keep the head pressure reasonable as you're not driving down the road giving a lot of fresh air to the coil. (It also helps keep you cool as you're leaning over that nice hot engine)!
I have heard differing opinions on adding some gas first or the oil first so either read your directions or do it the way I do. I first connect a can of "full oil charge" to the can tap then shake it well. MOST sets of directions say to charge it with the can upside down on the oil charge. With the compressor now running open the can tap and the oil should be pulled into the system. The oil charge should fill within a couple minutes. Shut it off, screw on a can of the 134a refrigerant, tap the can then, with the can UPRIGHT, open the can tapvalve and the can should start feeling cold. This is good as it means that the system is taking the gas.
NOTE: CHARGE WITH THE REFRIGERANT CAN UPRIGHT, NOT UPSIDE DOWN, AS YOU WANT TO CHARGE WITH GAS NOT LIQUID. CHARGING WITH THE CAN UPSIDE DOWN INTO THE LOW SIDE WILL CHARGE WITH LIQUID & WILL MOST LIKELY BLOW THE COMPRESSOR SEALS.
The Grand Wag should take just under 2 cans of refrigerant. Be careful adding more than 2 cans as you are probably overfilling it.
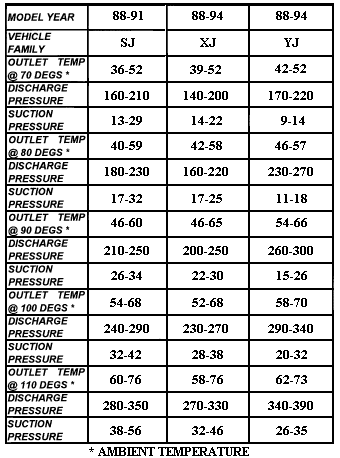
I watch the sight glass as I'm charging. In most cases, if there is some old oil left in the system, (which is true in most cases), it doe not fully dissolve in the R143a refrigerant so you will not get a totally clear sight glass when charging so don't necessarily rely on the clear sight glass. With most of the old oil removed & if you vacuumed thru both the high & low sides, the sight glass will be almost totally clear when at full charge. The key is to not add more than 2 cans of the refrigerant unless you are using a manifold gauge set & watching the pressures. (See charts below)
You are now DONE. Shut the engine off, close the service valves by turning counterclockwise, remove your fill hose & put the caps back on over the fill valve & service valves.
Remember that you originally jumped the pressure switch to bypass it so now reconnect the wires so power runs back thru this switch. If you develop a leak, it will stop the compressor from running & save you from ruining it!.
 |
R-134a CHARGE PORT ADAPTER CHART
 |
 |
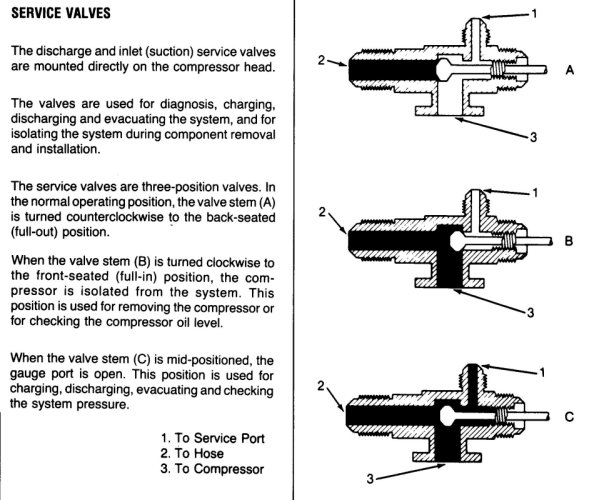 |
Service Valve used on Grand Wagoneers